What inspired me to make this amazing pillow was Amarixe's Youtube video.
To make this gorgeous bow pillow, you will need the following:
( I bought all of my supplies at Joanns Fabrics)
- 1 yard of fabric for the pillow
-1 yard of satin or silk for the bow
-Decorative pillow of your choice ( I used an 18" pillow)
- Iron
-Sewing machine or iron on adhesive
-Fabric pins
For your bow, you will need 4 - (7" x 23") and 2 - (2.75" x 6") pieces of the silk or satin fabric of your choice.
For your pillow, you will need 2 - (12" x 18.5") and 1 - (18.5" x 18.5") piece of fabric in the color of your choice.
Start by taking two pieces of the (7" x 23") pieces and put both silk parts facing each other. Now pin all around the corners and sew or glue. (Important Key: Leave 2" not sewed or glued on one side, that way you can flip it inside out when you're done.)
Next, take your two pieces of the (2.75" x 6") piece and again face both silk parts together. Then pin down all the corners and begin sewing or gluing. Remember, if you are gluing, allow the glue time to dry before you continue. (Important Key: Leave 1" not sewed or glued on one side, that way you can flip it inside out when you're done.)

Now that you have both pieces and you can now fold them and sew together the side that is apart.
When you do so, bring the seam towards the middle.
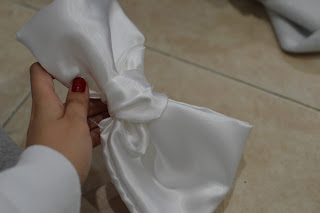
Take the smaller little loop and bring it in towards the corner of the bigger loop and keep bringing it in until you reach the middle.
Then, just play with it a little until you reach the form of bow that you're satisfied with.
And you have your bow!
Now take the other two pieces of silk or satin that you have left and put them together with the silk parts facing each other again. This time you will only sew or glue the long parts and not the outer edges. When you're done, flip it inside out.
Then take the piece and run it through the back of the bow until the bow is centered.
As soon as you have your bow and long piece together, attach it to the middle of the fabric that's (18.5" x 18.5"). Pin the sides and sew or glue. If theres any, cut the excess silk or satin off the sides.
Now that you have half of the pillow finished, we can move on the easier part.
Take the two (12" x 18.5"). Start by one, take one of the long sides of the fabric and fold twice ironing down each fold you do so it stays. Take the other piece and do the same. When you have both folded pieces, sew or glue them down so they wont unfold.
Then, take one of the (12" x 18.5") and put it over the big piece you have with the bow on it. Face them always Right VS. Right. Pin the edges down and sew or glue. Once you have that done, take the other piece and do the same. Flip the pillow case inside out and voila!
You have your beautiful bow pillowcase.
Almost done, take your pillow insert and put it inside your pillow case.
And now, you have a pretty decorative bow pillow... :)
Hope you enjoyed this little DIY. More coming soon!


0 comments:
Post a Comment